A successful custom print dress starts long before fabric reaches the sewing line.
For clothing brands, the most important steps are preparing the correct print file, choosing a printing method that matches the fabric, confirming the artwork scale and color, approving a print sample, and checking how the pattern falls across the finished garment.
At Shengfu, we recommend solving these details during sampling because correcting a digital file costs very little compared with remaking hundreds of printed dresses.
Article Summary
Use the sections below to quickly find the information you need:
- 1. What Files Should You Send to the Factory?
- 2. How High Should the Print Resolution Be?
- 3. How to Choose the Right Printing Method
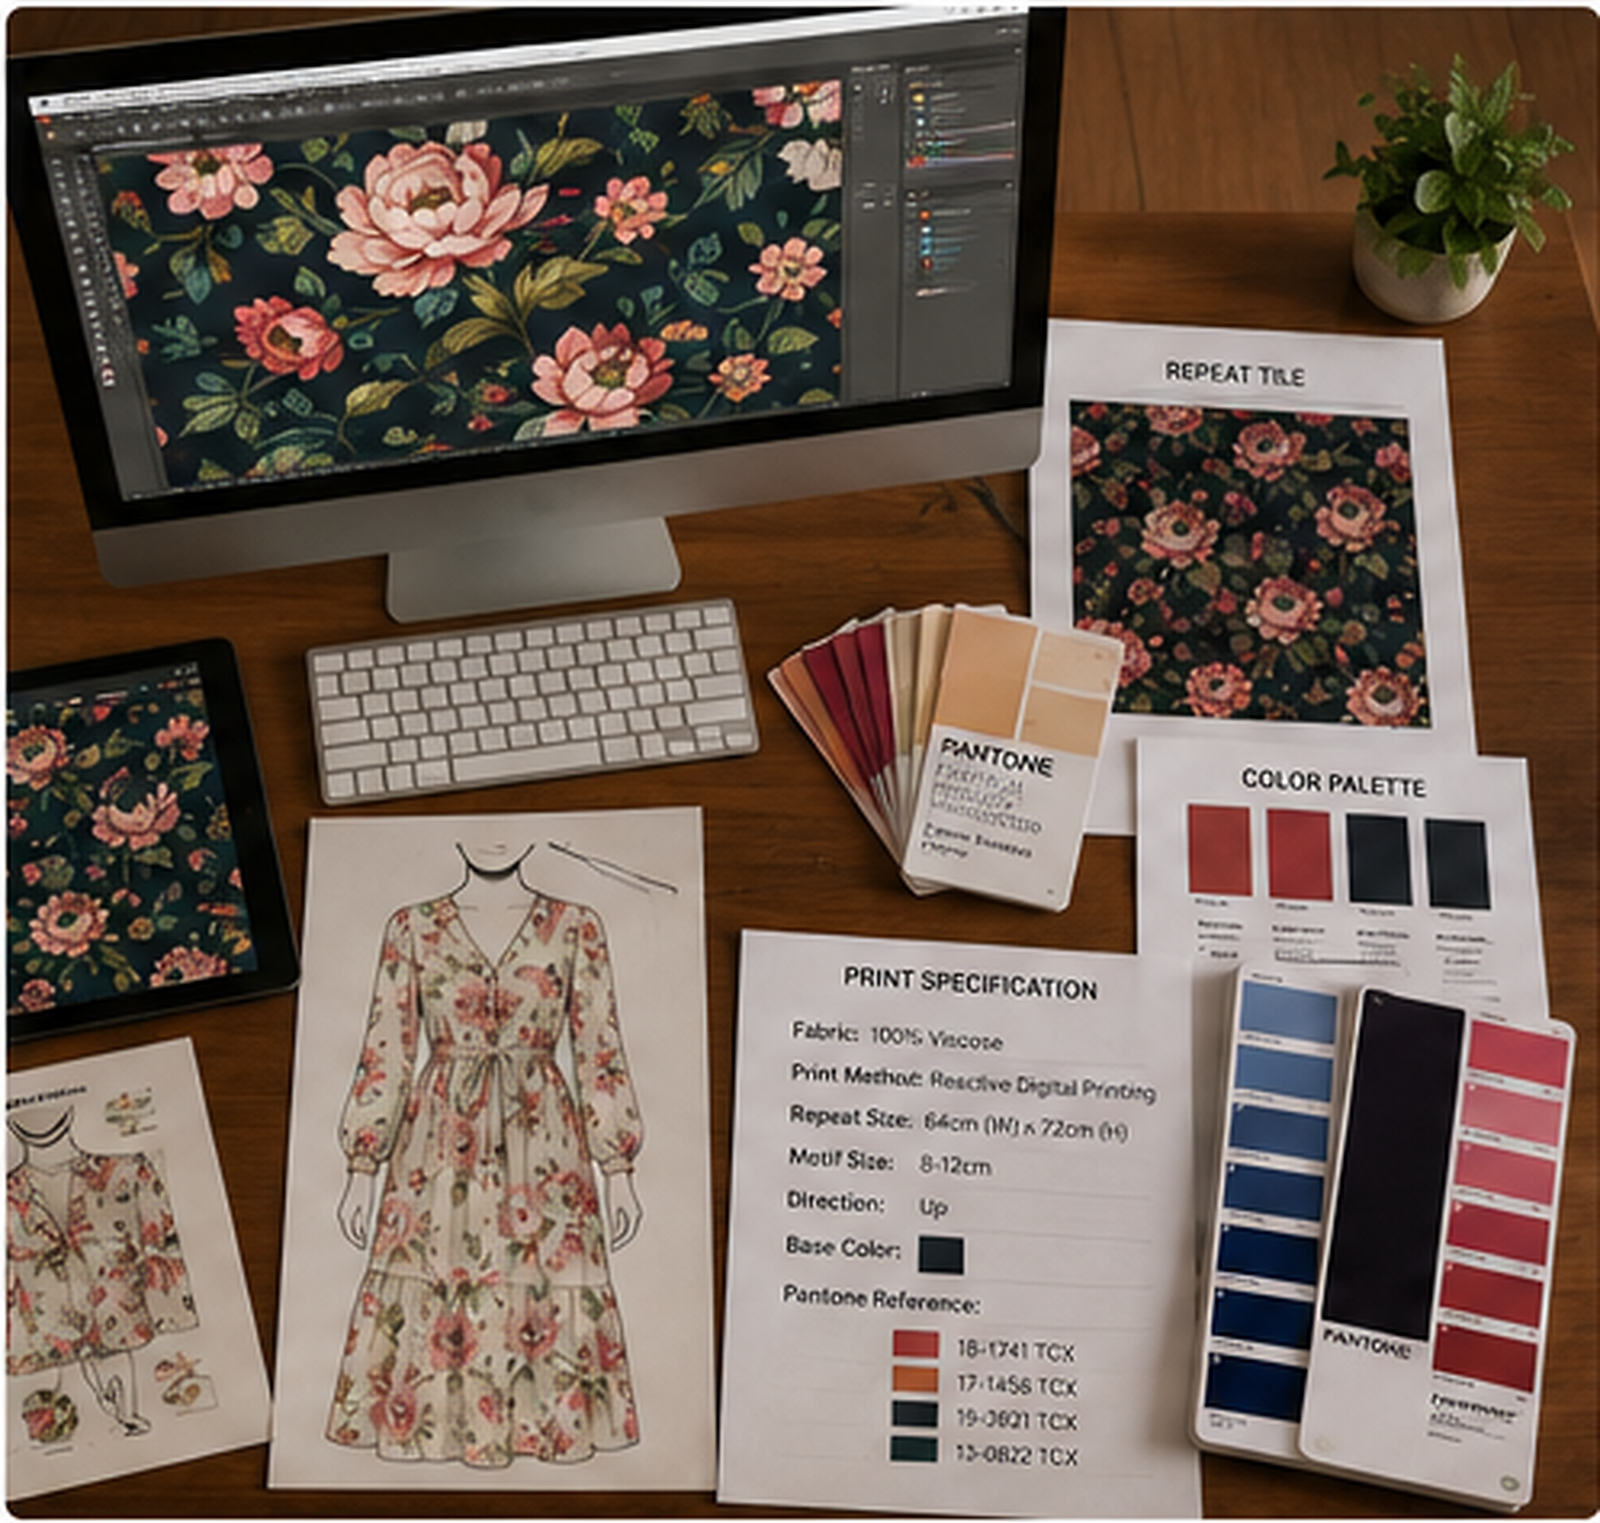
- 4. How to Control Print Size and Repeat
- 5. How to Control Print Colors
- 6. Custom Print Dress Production Process
- 7. Common Printing Problems to Avoid
- 8. Why Work With Shengfu?
- FAQ
1. What Files Should You Send to the Factory?
The print file directly affects the final result.
For most custom dress projects, we recommend sending the original artwork rather than an image downloaded from a website, screenshot, or compressed preview.
Recommended File Formats
| Artwork Type | Recommended Files | Best Use |
|---|---|---|
| Vector artwork | AI, PDF, SVG | Logos, geometric patterns, line art |
| Raster artwork | PSD, TIFF, high-resolution PNG | Florals, photographs, watercolor prints |
| Preview file | JPG or PNG | Visual reference only |
Adobe Illustrator supports formats such as AI, PDF and SVG while preserving or exchanging vector artwork. Vector graphics work especially well for geometric patterns and clean line designs because the artwork can scale without the same pixel-based limitations as raster images.
Before Sending the File
We recommend checking:
- Artwork dimensions
- Pattern repeat size
- Print orientation
- Color references
- Artwork scale
- Embedded images
- Fonts converted to outlines when relevant
- Final print position
- Original editable file availability
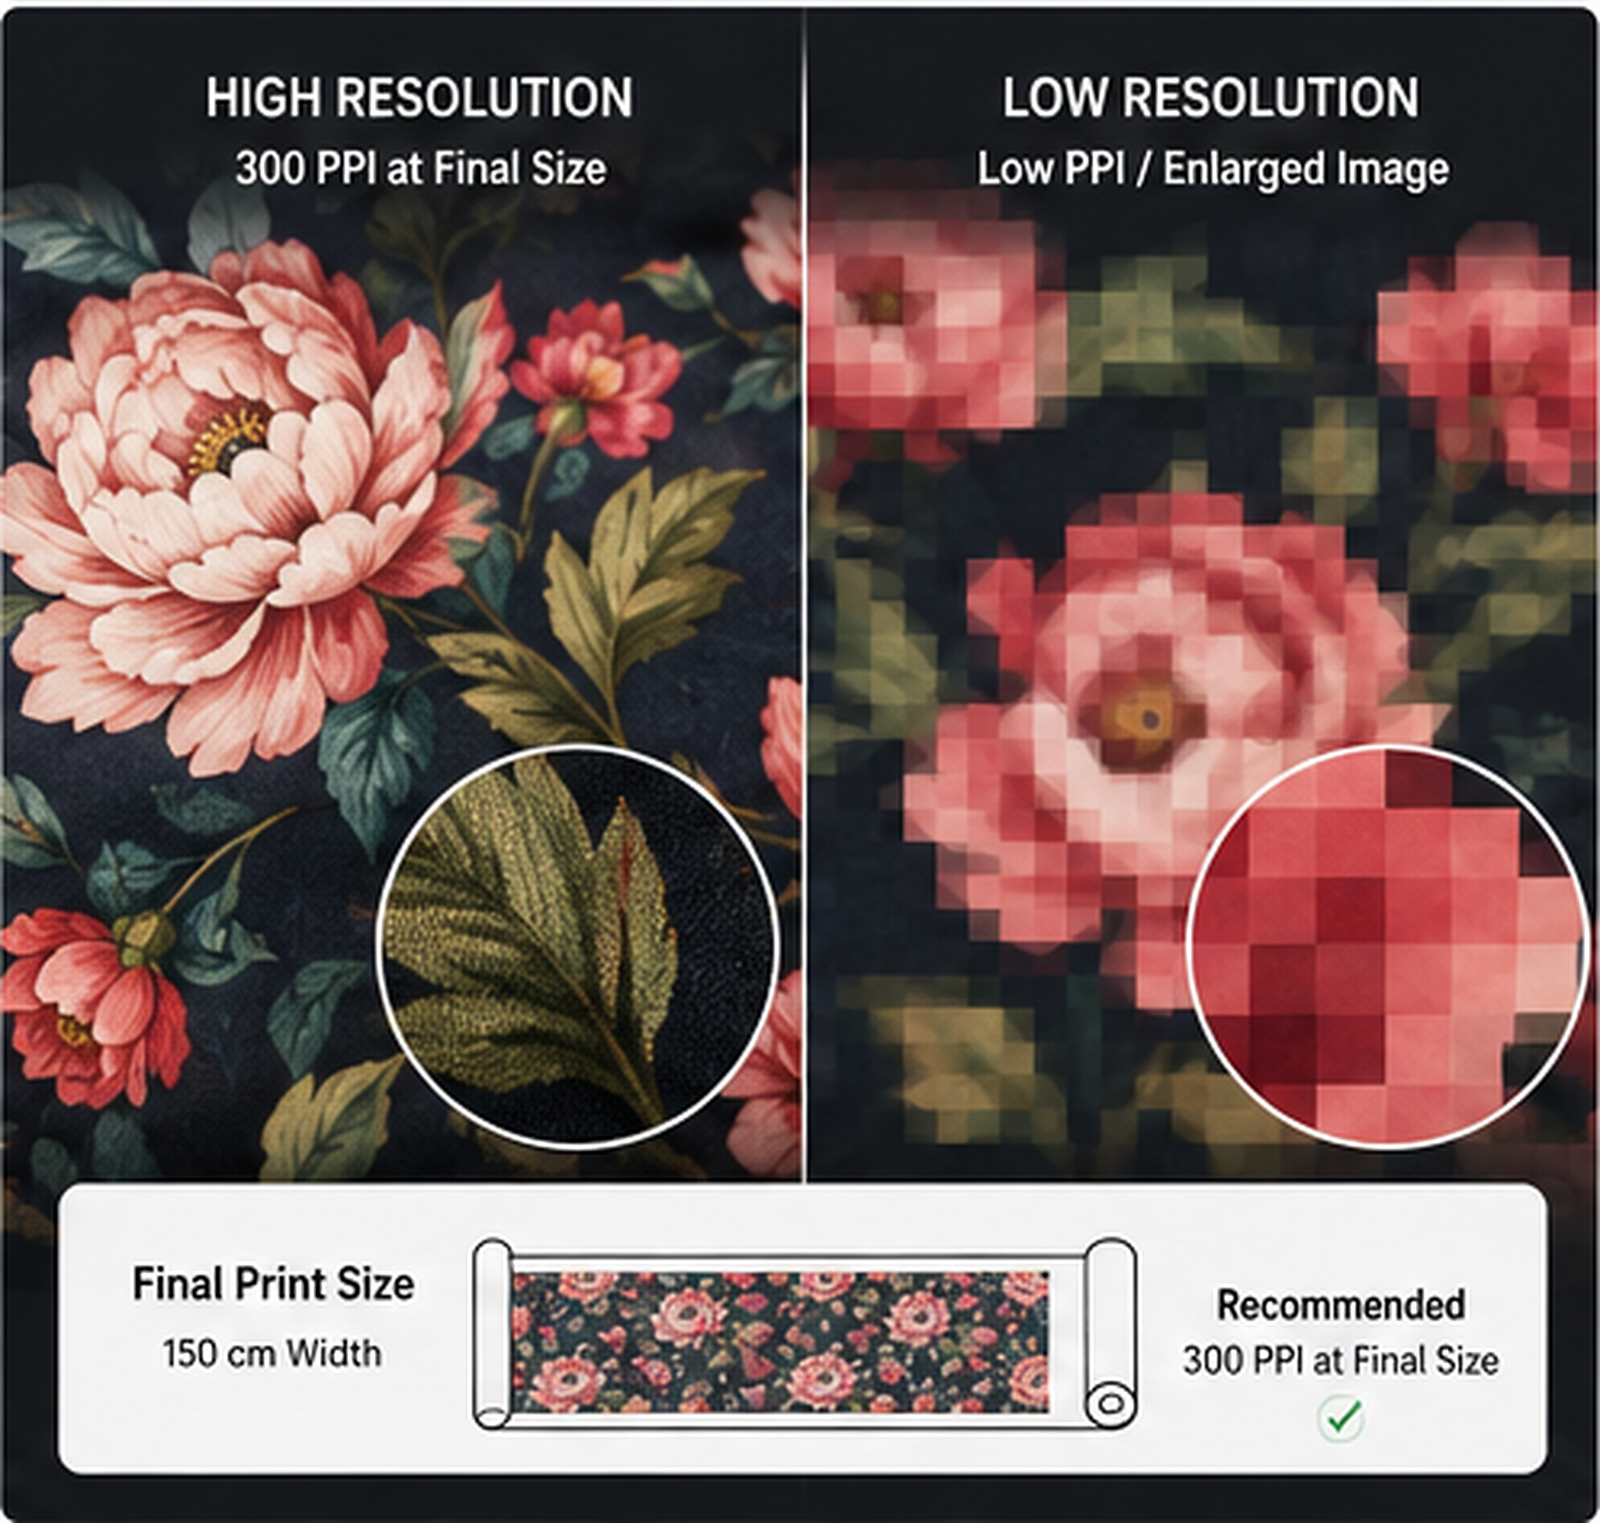
For example, a floral JPG may look perfectly sharp on a laptop. However, when the factory enlarges a small image to cover 150 cm of fabric width, the flowers can become visibly pixelated.
2. How High Should the Print Resolution Be?
For raster artwork, check resolution at the final intended print size.
As a practical starting point, we recommend preparing raster artwork at approximately 300 PPI at final size whenever possible.
Adobe also identifies 300 PPI as a standard target for high-quality printed images. However, the required resolution can vary according to printer, artwork type, fabric texture and final viewing distance.
The Important Part: Final Size
Simply seeing “300 DPI” or “300 PPI” in Photoshop does not guarantee a good file.
Consider this example:
Artwork: 3000 × 3000 pixels
At 300 PPI, it can print at approximately:
10 × 10 inches
If you enlarge the same artwork dramatically, its effective resolution drops.
Therefore, tell the factory the actual intended motif size.
Shengfu File Recommendation
For a custom dress print, ideally provide:
Original Artwork + Final Print Size + Repeat Size + Color Reference + Dress Reference
This gives the print technician much more useful information than simply sending a JPG and saying:
“Please print this pattern.”
3. How to Choose the Right Printing Method
There is no single “best” printing method for every custom print dress.
The correct method depends primarily on:
Fabric fiber + artwork + color + quantity + hand feel + budget
This is why we prefer to review the fabric and artwork together before confirming the printing process.
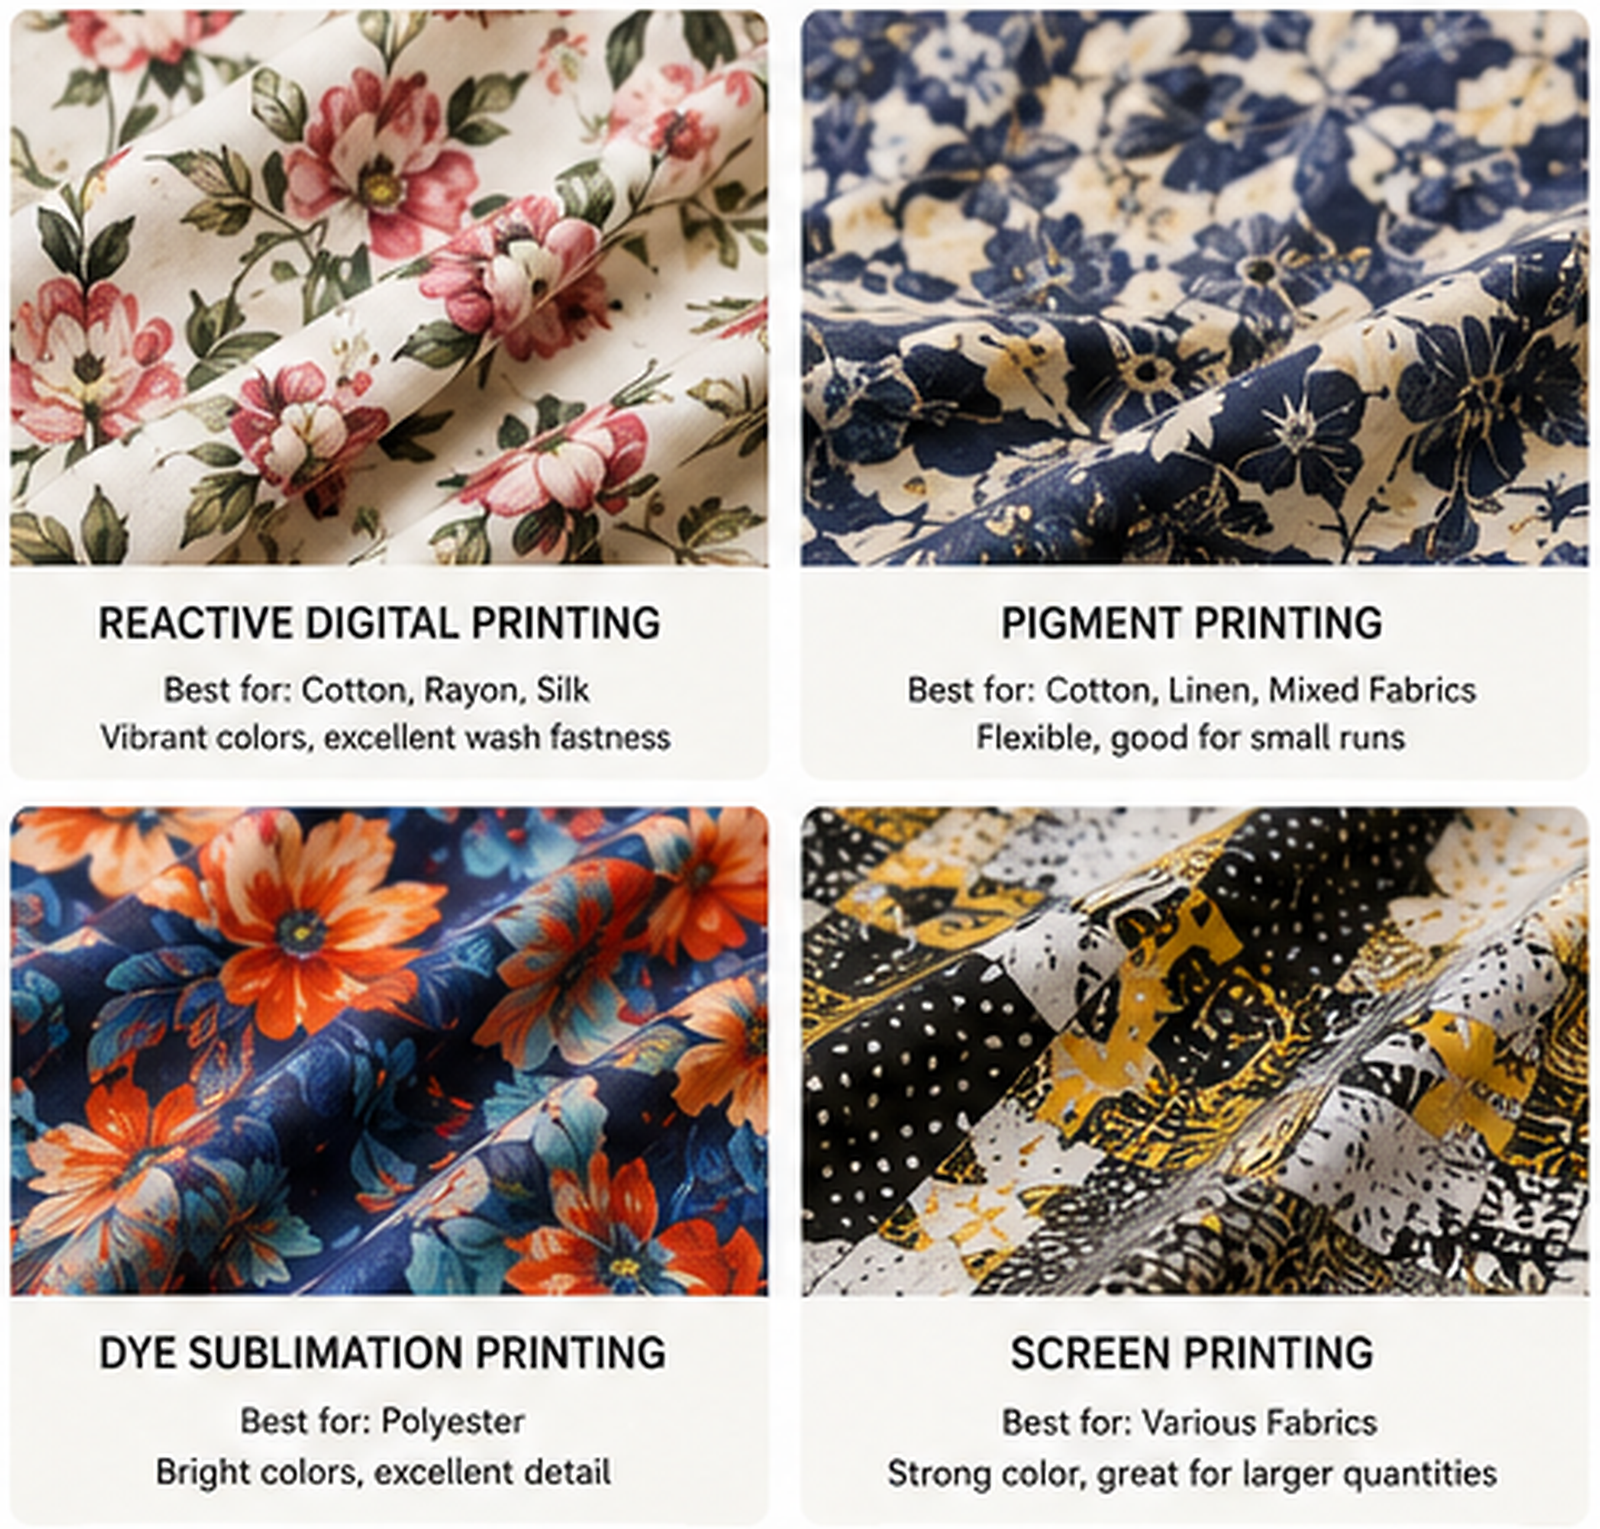
Common Options
| Printing Method | Typical Fabric | Best For | Things to Consider |
| Reactive Digital Printing | Cotton, rayon, silk, hemp | Premium fashion prints, detailed florals | Requires more processing |
| Pigment Digital Printing | Cotton, linen and many textiles | Small runs, flexible development | Hand feel and color need testing |
| Dye Sublimation | Polyester | Detailed graphics, gradients, vivid colors | Best on polyester and usually light bases |
| Screen Printing | Various fabrics | Repeated patterns, solid colors, larger quantities | More setup for multiple colors |
Reactive Digital Printing
For cotton, rayon and similar cellulose-based fabrics, reactive digital printing can create vibrant colors and detailed patterns.
Reactive dyes bond with compatible fibers and can provide good water, light and rubbing resistance after the correct processing. Mimaki lists cotton, hemp, silk and rayon among typical compatible materials.
We often consider reactive printing when the buyer wants a more premium printed-fabric result.
However, the process usually involves additional preparation, steaming and washing.
Pigment Digital Printing
Pigment printing offers greater flexibility across different textile types.
The pigments sit differently on the fiber compared with reactive dyes, and manufacturers typically use binders and heat fixation. This can simplify the production process.
For smaller custom collections, pigment printing can therefore become an attractive option.
Still, we recommend approving the actual fabric sample because color depth and hand feel can vary.
Dye Sublimation
For polyester dresses, dye sublimation can reproduce fine lines, gradients and detailed graphics very effectively.
The process uses heat to transfer or fix dye into polyester fibers. Epson notes that sublimation works particularly well with white or light-colored polyester and polyester-rich fabrics.
However, we would not automatically recommend sublimation simply because the artwork looks complex.
Fabric composition comes first.
4. How to Control Print Size and Repeat
This is one of the areas where buyers make the most mistakes.
A print design does not only have a color and shape.
It also has a scale.
For example, the same flower can measure:
- 2 cm
- 5 cm
- 10 cm
- 20 cm
Each size creates a completely different dress.
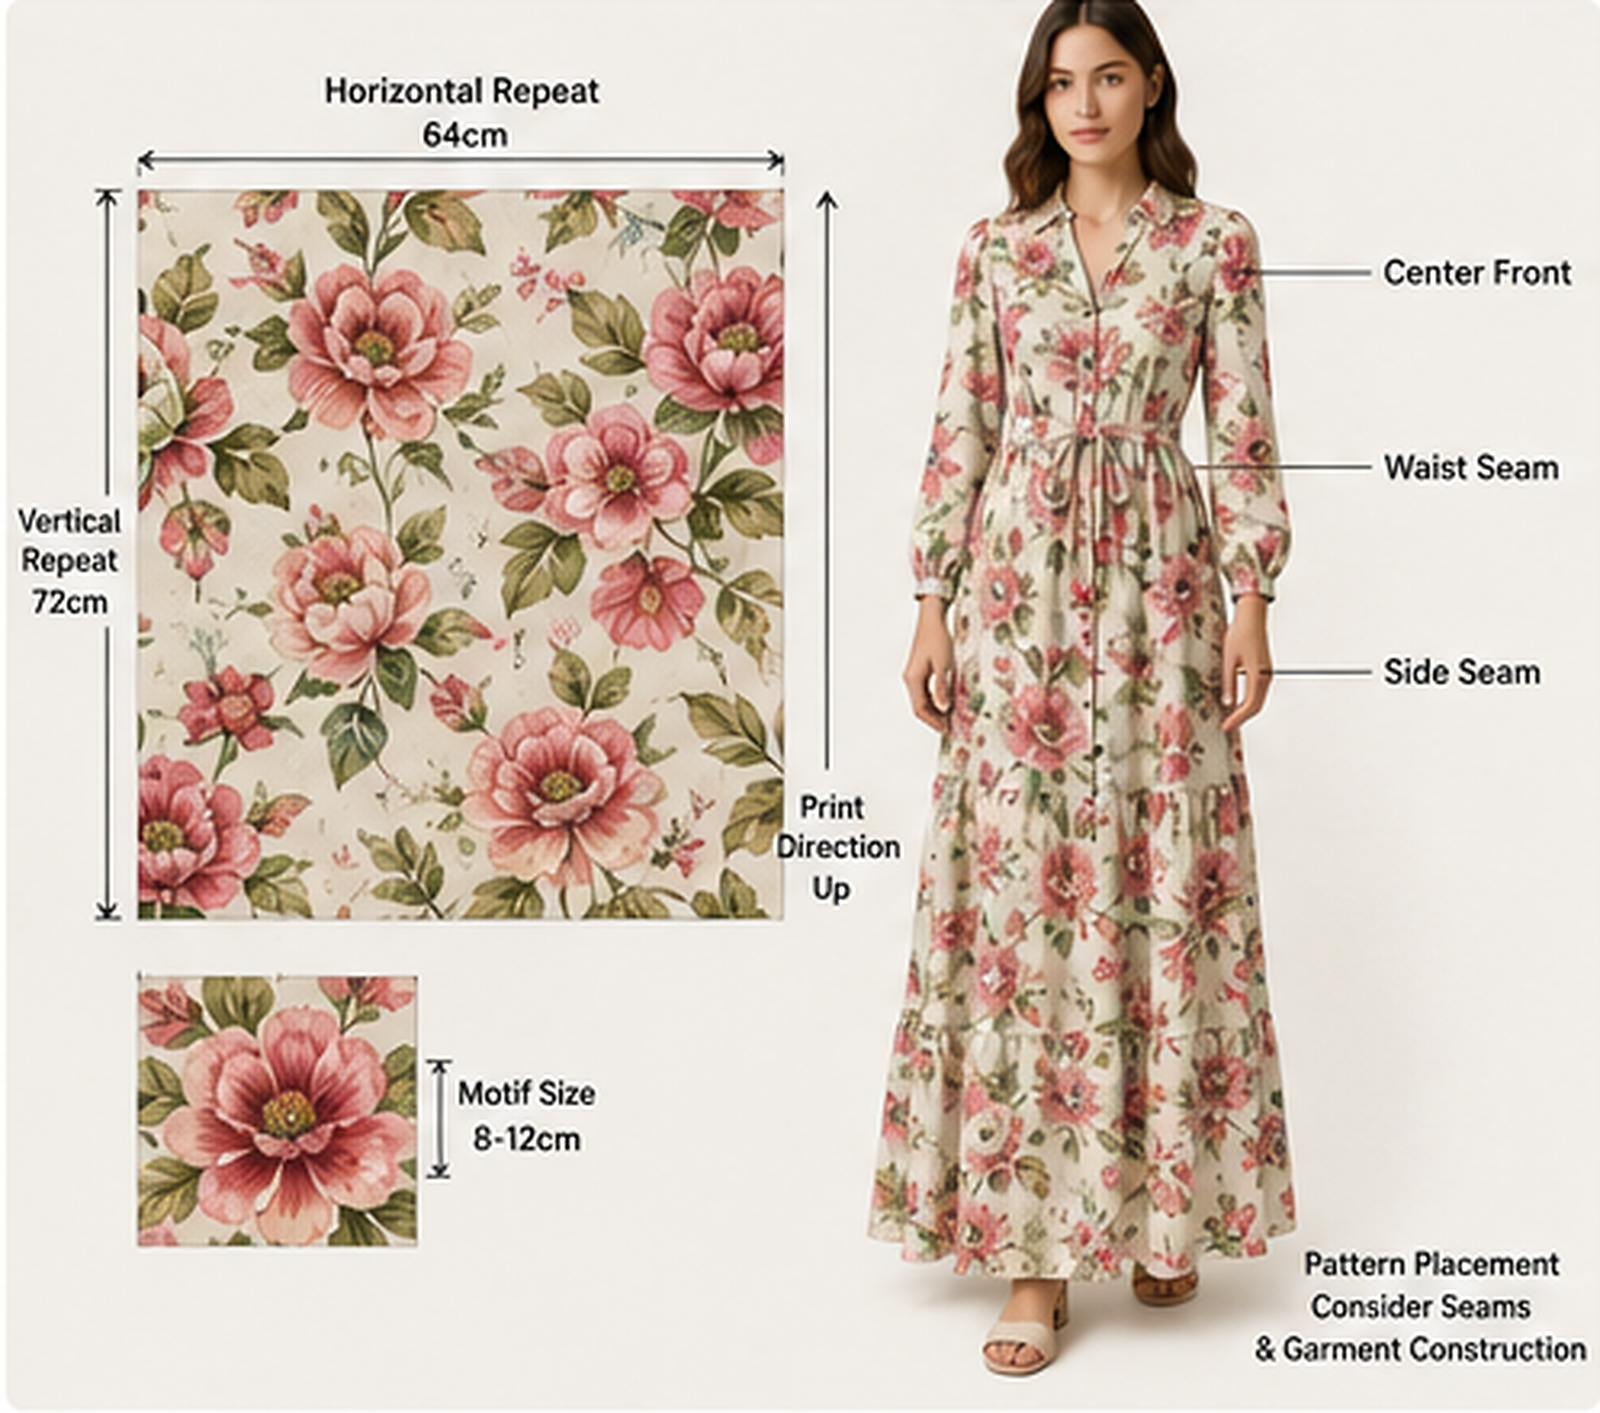
Therefore, your artwork specification should define at least:
Motif Size
Horizontal Repeat
Vertical Repeat
Print Direction
Pattern Placement
Seam Placement Matters
Imagine a large flower positioned directly across:
- Center-front seam
- Waist seam
- Bust dart
- Side seam
- Zipper
The fabric may look correct before cutting, but the finished dress may look unbalanced.
For large floral, stripe, plaid or engineered prints, our pattern and cutting teams need to consider pattern matching before bulk cutting.
That extra planning can significantly improve the finished garment.
5. How to Control Print Colors
A color displayed on your laptop is not a reliable production standard.
Different:
- Screens
- Fabrics
- Fibers
- Inks
- Printers
- Finishing processes
can all change the final appearance.
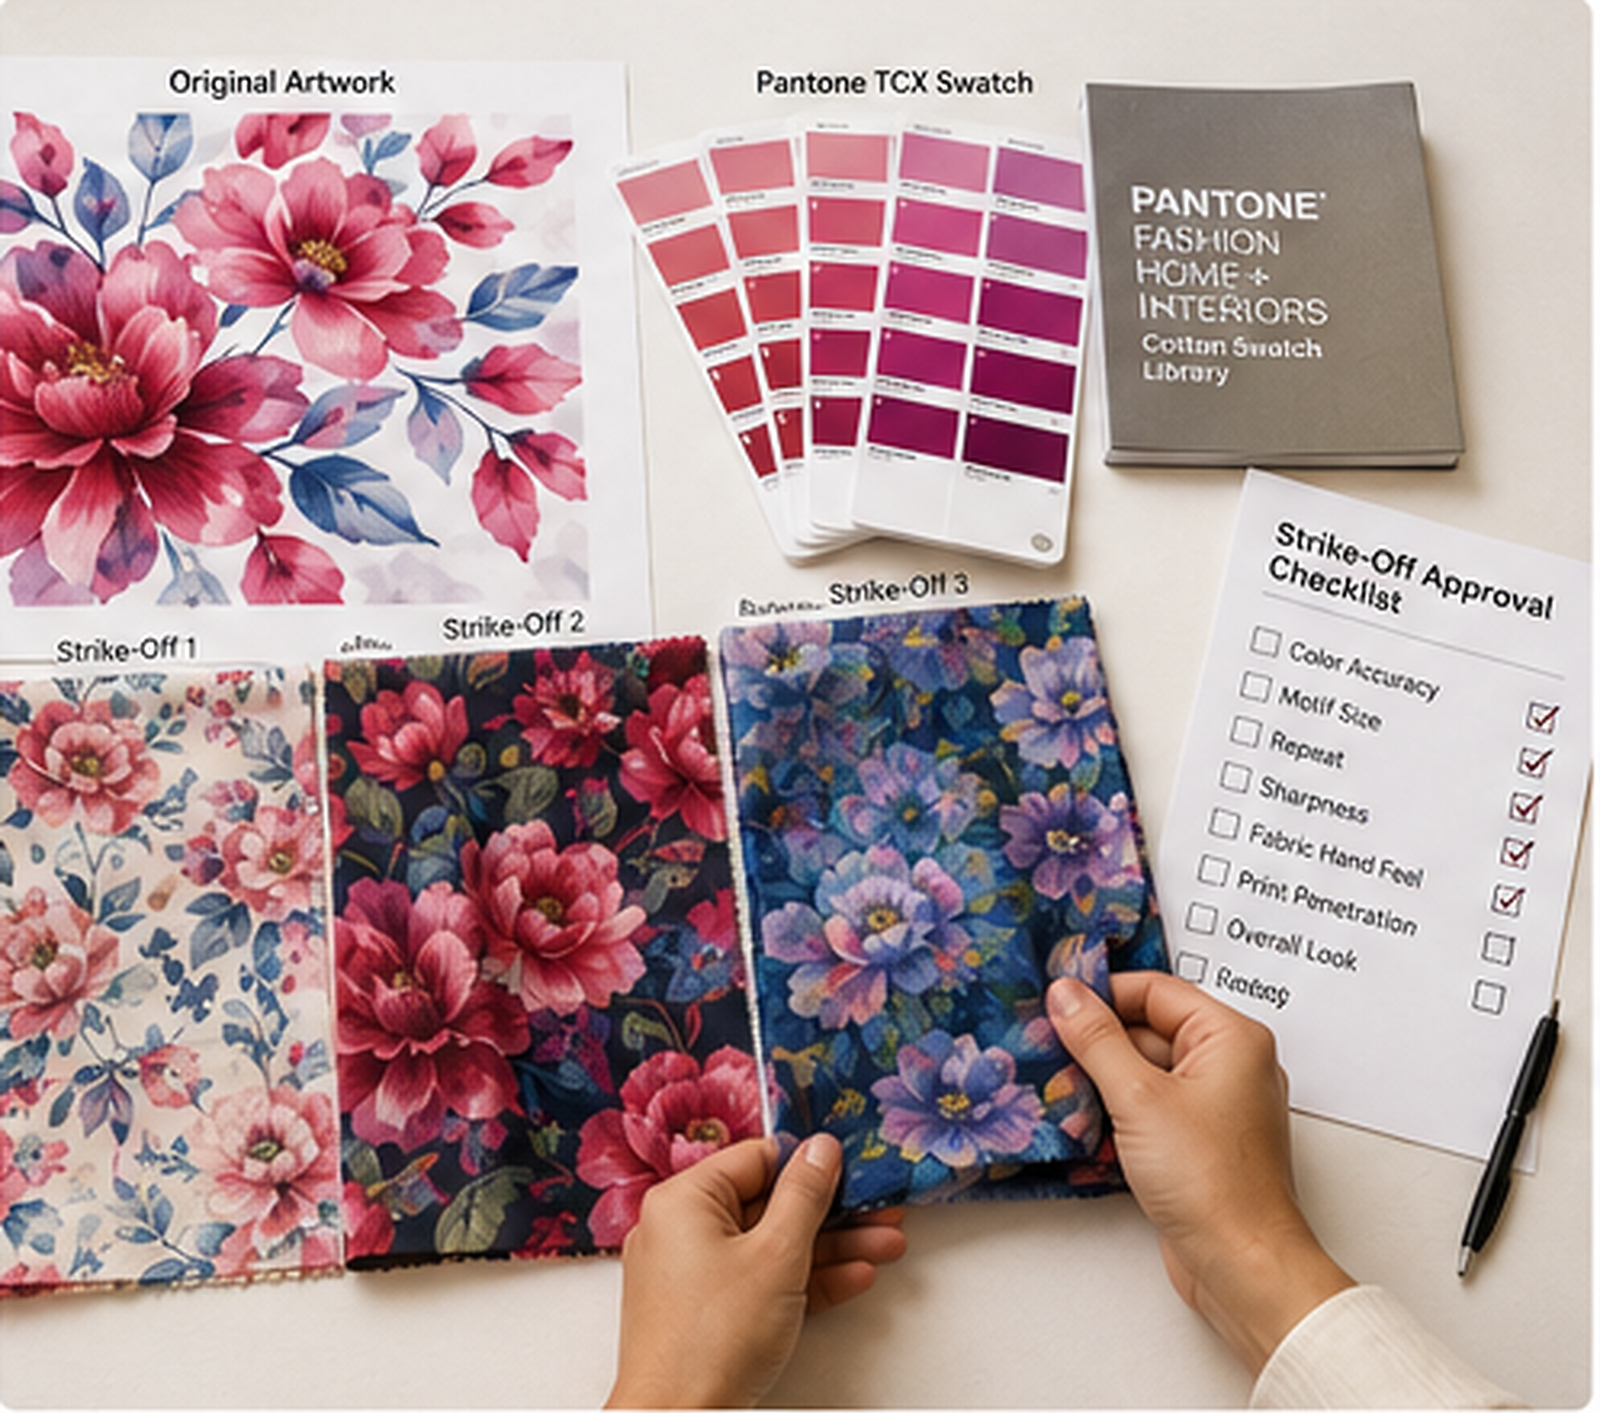
Therefore, we recommend providing a physical or recognized textile color reference whenever color accuracy matters.
Pantone’s Fashion, Home + Interiors system includes TCX textile color standards on cotton, which designers and product developers commonly use when specifying fashion and textile colors. Pantone also warns that colors displayed digitally may not exactly match physical Pantone standards.
Better Color Instruction
Instead of:
“Make the flowers dark red.”
Use:
“Target color: Pantone XX-XXXX TCX, subject to strike-off approval.”
Even better, provide:
Pantone Reference + Physical Swatch + Digital Artwork
Always Approve a Strike-Off
Before bulk printing, we strongly recommend approving a strike-off, which is a small printed fabric sample produced with your actual design.
Check:
- Main colors
- Background color
- Sharpness
- Motif size
- Repeat
- Fabric hand feel
- Print penetration
- Fine details
A photograph can help with communication. However, the physical sample gives you a much more reliable reference.
6. Custom Print Dress Production Process
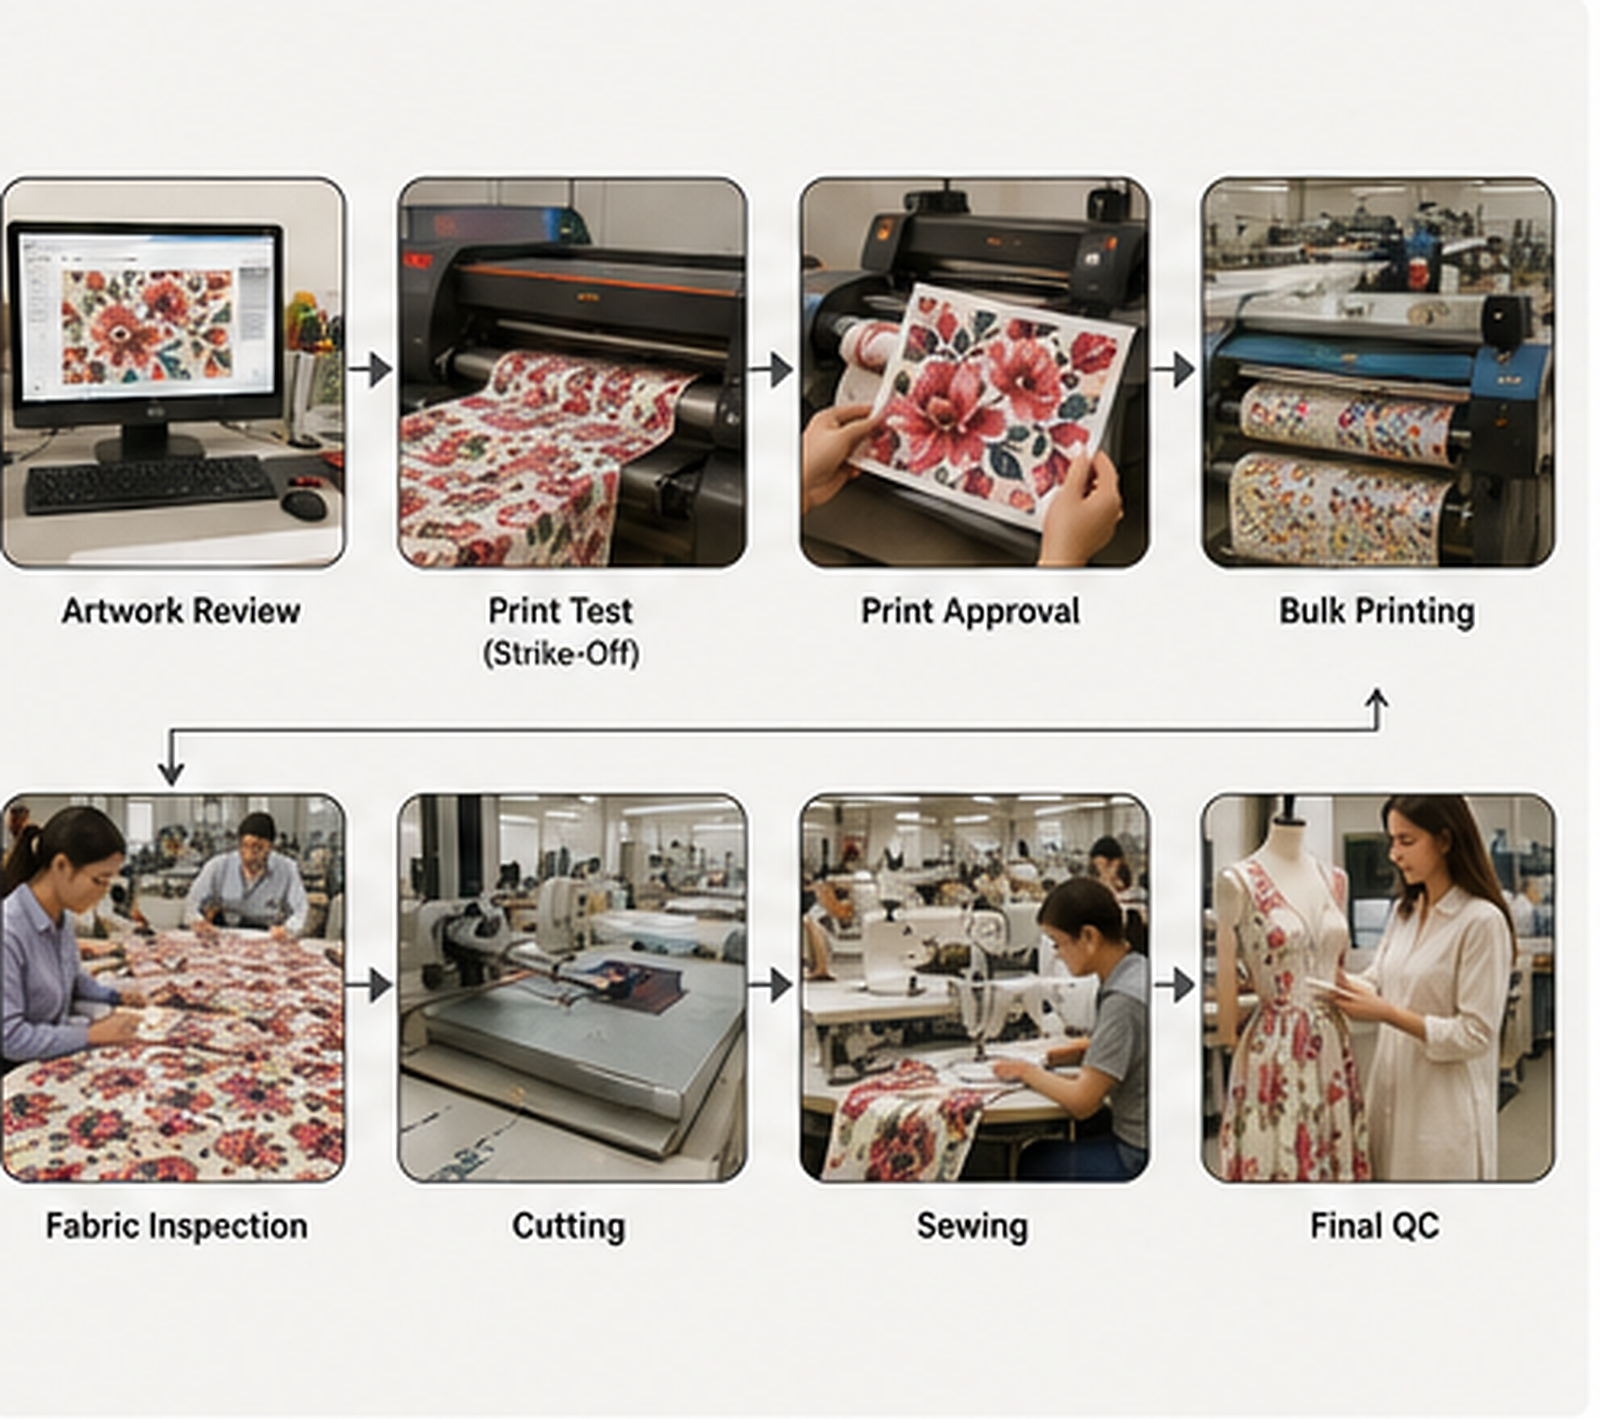
A professional custom print dress project normally follows a controlled sequence.
Step 1 — Review the Design
We review:
Dress design + artwork + fabric + measurements + quantity
Step 2 — Prepare the Artwork
We confirm:
File → Scale → Repeat → Direction → Color
Step 3 — Select Fabric and Printing Method
We choose the process according to the fiber and required result.
Step 4 — Create a Strike-Off
The buyer confirms the print before bulk fabric production.
Step 5 — Produce Printed Fabric
The printing supplier produces and finishes the bulk fabric according to the approved standard.
Step 6 — Inspect the Fabric
We check the print before cutting.
Step 7 — Cut the Garment
For directional or large prints, the cutting team controls motif orientation and important placement areas.
Step 8 — Sew the Dress
The sewing line follows the approved sample and technical specifications.
Step 9 — Final QC
The QC team checks both garment construction and visual print consistency.
Artwork → Print Test → Approval → Bulk Printing → Fabric Inspection → Cutting → Sewing → QC
7. Common Printing Problems to Avoid
Low-Resolution Artwork
A small internet image rarely becomes a good all-over dress print.
Solution: Send the original artwork and check effective resolution at the final size.
Wrong Fabric for the Printing Method
A beautiful printing technique can still fail when it does not suit the fiber.
Solution: Confirm fabric composition before selecting the print process.
No Repeat Specification
The factory cannot accurately guess how large you want the pattern.
Solution: Define motif and repeat dimensions.
Relying Only on Screen Colors
Your monitor does not represent the final textile accurately.
Solution: Use a physical color reference and approve a strike-off.
Ignoring Pattern Direction
Flowers, animals, logos and text can appear upside down after cutting.
Solution: Mark the print direction in the artwork or tech pack.
Ignoring Seam Alignment
A large motif may break badly across the waist or center front.
Solution: Review the finished garment, not only the printed fabric.
Skipping Print Testing
This saves a little development time but creates a much larger bulk-production risk.
Solution: Approve the actual print before cutting bulk fabric.
8. Why Work With Shengfu?
Anyone can receive an artwork file.
The real challenge lies in turning that file into a commercially producible dress.
This requires the factory to understand more than printing.
The team must consider:
Artwork → Fabric → Pattern → Printing → Cutting → Sewing → Fit → QC
At Shengfu, we prefer to identify potential problems during product development rather than discover them after bulk production begins.
For example, if your artwork resolution is too low, the fabric does not suit the requested printing method, or a large motif will fall awkwardly across the waist seam, these issues should be discussed before production.
That is the type of communication we believe a professional custom clothing manufacturer should provide.
We can work from:
- Your original print artwork
- Tech pack
- Reference dress
- Fabric request
- Inspiration image
- Existing sample
If you already have a print design, send us the artwork + dress design + fabric requirement + target quantity.
Our team can review whether the artwork is suitable for production and discuss the most appropriate next step.
Start Your Custom Print Dress Project With Shengfu
FAQ
References
- Adobe — Print Dimensions and Resolution in Photoshop
Adobe recommends 300 PPI as a standard starting point for high-quality printed output.
Adobe Photoshop Print Resolution Guide - Adobe — Illustrator Supported File Formats
Adobe documents AI, PDF, SVG and other file formats used in professional artwork workflows.
Adobe Illustrator File Format Guide - Mimaki — Textile Printing Ink and Fabric Compatibility
Mimaki provides technical guidance for reactive, pigment, sublimation, disperse and acid textile printing processes across different fiber types.
Mimaki Textile Printing Guide - Pantone — Fashion Home + Interiors Textile Color Standards
Pantone’s TCX cotton standards provide physical color references for fashion and textile product development.
Pantone Fashion and Textile Color Information - OEKO-TEX — ECO PASSPORT
OEKO-TEX evaluates textile chemicals, colorants, printing inks and auxiliaries against defined requirements, which provides useful context when brands consider chemical management in textile printing.
OEKO-TEX ECO PASSPORT